Tent Styles
Details
Set-Up Instructions
Stake Loops
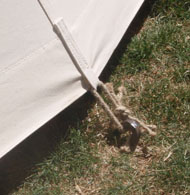
Start with heavy webbing, either purchased or self-made from canvas scraps. Cut a piece 12 inches long. Fold about a half inch over on each end to hide the raw end and pound it a few times with a hammer to make it stay flat while you sew.
Fold the webbing in half and wrap it right around the edge of the wall canvas on a seam. Do not leave the webbing hanging out past the edge of the wall. Bar tack about three quarters of an inch from the edge (avoiding the hem entirely, it's tough to sew through 12 layers of canvas AND two layers of heavy webbing.) Next box stich the rest of the length of webbing onto the seam, being careful to that the webbing is lined up with the seam on both sides (i.e inside and outside)
Now you have a webbing loop that is too close to the wall to drive a stake through it. This is ok.
Next take a short (14 inches seems to work about right) piece of approximately ¼ inch rope and push it through the webbing loop in the section near the hem that you didn't sew down. Tie with a square knot.
Why go through this trouble instead of just making a webbing loop that the stake can go through? Because, rope is more chafe resistant and, more importantly, when the stake eventually does wears through it, it is very easy to tie on a new rope loop. Sewing on a new webbing loop would be much more difficult.
Wall Attachment
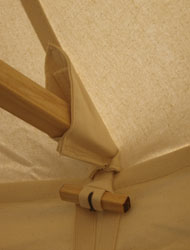
A loop and toggle system works very nicely for wall attachment. It's more secure than S-hooks and much easier to set-up and break down than ties.
To make the toggle you can use 3/8" dowel, or if you have the tools, cut some hardwood into 3/8 x 3/8 inch sticks. Pieces 2" to 2 ½" long work well. Drill a single small (1/8") hole in the center of each piece.
Next you will need heavy ½" webbing (or medium 1" folded to ½" width). Cut two pieces 12" long. The first piece you will fold in half and bar-tack about ½" from the fold. You will have to experiment with this distance some. You want to form a small loop into which a toggle will just barely fit. slide a toggle into it and stitch through the webbing and toggle (that's what you drilled the hole for) with waxed thread.
This is better than just tying the toggle to the end of the loop because the webbing takes the load. The waxed thread only needs to keep the toggle from getting lost.
Finally, sew the webbing strap into the inside of the roof on a seam. Be sure to leave about 3/4" free so the toggle can move around a bit. Otherwise it will be difficult to close/open the toggle & loop.
Take the other piece of webbing and bend it in half so that it forms an open loop. (examine the photo to get a better idea) Sew it onto one side of the wall at a seam. You will want to leave about 2" of the loop open above the top edge of the wall. Experiment with this a bit as the exact length will depend on your toggle.
It's probably best to experiment on some scraps. Be careful not to get the loop too small or it will be difficult to get on and off. Once you have the dimensions right you can make a bunch at once.
| |
|
©2009, 2010, 2011, & 2012 Gene Eisele
Privacy Policy
Contact Me
|


